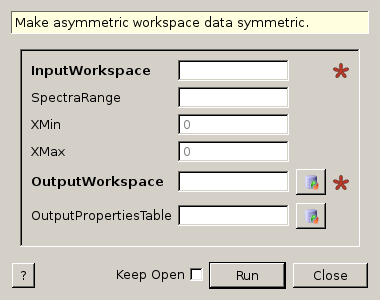
Symmetrise dialog.
Table of Contents
| Name | Direction | Type | Default | Description |
|---|---|---|---|---|
| InputWorkspace | Input | MatrixWorkspace | Mandatory | Sample to run with |
| SpectraRange | Input | int list | Range of spectra to symmetrise (defaults to entire range if not set) | |
| XMin | Input | number | 0 | X value marking lower limit of curve to copy |
| XMax | Input | number | 0 | X value marking upper limit of curve to copy |
| OutputWorkspace | Output | MatrixWorkspace | Mandatory | Name to call the output workspace. |
| OutputPropertiesTable | Output | TableWorkspace | Name to call the properties output table workspace. |
Symmetrise takes a matrix workspace containing asymmetric data and makes it symmetrical around x=0 by reflecting a given section of the right hand side (positive) on the left hand side (negative).
Two values, XMin and XMax, are chosen to specify the section of the positive side of the curve to be reflected onto the negative side, the sample curve is cropped at XMax ensuring that the symmetrised curve has a symmetrical X range.
Example - Running Symmetrise on an asymmetric workspace.
import numpy as np

# create an asymmetric line shape
def rayleigh(x, sigma):
  return (x / sigma ** 2) * np.exp(-x ** 2 / (2 * sigma ** 2))

data_x = np.arange(0, 10, 0.01)
data_y = rayleigh(data_x, 1)

sample_ws = CreateWorkspace(data_x, data_y)
sample_ws = ScaleX(sample_ws, -1, "Add")  # centre the peak over 0

symm_ws = Symmetrise(InputWorkspace=sample_ws, XMin=0.05, XMax=8.0)
Categories: Algorithms | CorrectionFunctions\SpecialCorrections
Python: Symmetrise.py