Table of Contents
This document is intended for Mantid developers as a guide to the architecture of the DataProcessor widget. This is a C++ widget exposed to Python that can be found in mantid/MantidQt/MantidWidgets/. It consists of several classes defining the widget behaviour as well as unit tests covering most of its functionality.
A design document including motivation, proposed solution and main requirements for the widget can be found in https://github.com/mantidproject/documents/tree/master/Design/DataProcessorAlgorithmUI.
The purpose of this document is to explain and illustrate how the widget can be inserted into a custom interface and the minimal requirements needed to build it and use it. However, this guide is built with Reflectometry at ISIS in mind, as it is the only used case at the moment.
The DataProcessor widget is a technique-independent MantidWidget that can be used to execute complex batch-processing via DataProcessorAlgorithms by reducing sequentially groups of runs that can be later post-processed.
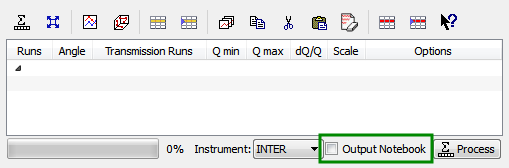
The widget, displayed below, consists in a set of table editing options, a processing table where runs can be entered for reduction, a progress bar reporting progress, a combo-box where different instruments can be selected, a checkbox to request a notebook which will contain all the steps taking place in the reduction, and a button to start processing the table.
Different elements can be specified to build the widget. Some of them are mandatory. Below is a description of the available elements that can be used to build and define the behaviour of the widget.
A whitelist is an object defining the number of columns, their names, and the algorithm property names linked to them. Below is an example illustrating how to create a white list and add some columns using the public method addElement():
whitelist = MantidQt.MantidWidgets.DataProcessor.WhiteList()
whitelist.addElement('Runs', 'InputWorkspace', 'The run to reduce')
whitelist.addElement('Angle', 'ThetaIn', 'The incident angle')
whitelist.addElement('Transmission Runs', 'FirstTransmissionRun', 'Transmission runs')
whitelist.addElement('Q min', 'MomentumTransferMin', 'Q min')
whitelist.addElement('Q max', 'MomentumTransferMax', 'Q max')
whitelist.addElement('dQ/Q', 'MomentumTransferStep', 'Resolution')
whitelist.addElement('Scale', 'ScaleFactor', 'Scale Factor')
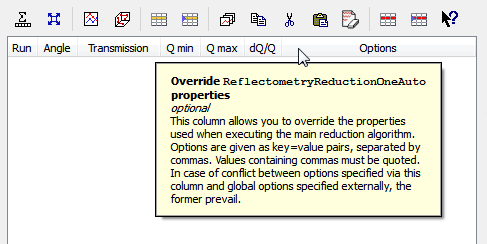
Note that, in addition to the specified columns, an extra column called Options is always added. Users can use this column to override default property values of the main reduction algorithm. It uses a HintingLineEdit delegate to display the main reduction algorithm properties and provides auto-completion capability. See section Processing Algorithm for more information.
The example above defines a table with seven columns, where the first column is named Run, is linked to an algorithm property
named InputWorkspace and has a description The run to reduce, the second column is named Angle, it is
linked to an algorithm property called ThetaIn, and has description Angle in degrees, and so on. Note that
there is no restriction in terms of the number of columns, their names, or the name of the algorithm properties linked to them.
Descriptions are shown as part of the “What’s This?” mode which can be accessed by clicking on the “What’s This?” action on the toolbar (last icon) and the column of interest. Below is an example:
The method addElement() also accepts two extra optional arguments which are used to determine the name of the reduced workspace. See section How to control the name of the output workspaces for more details. These extra parameters have no effect on the way the table is displayed. Therefore, the following whitelist:
whitelist = MantidQt.MantidWidgets.DataProcessor.WhiteList()
whitelist.addElement('Runs', 'InputWorkspace', 'The run to reduce', True, '')
whitelist.addElement('Angle', 'ThetaIn', 'The incident angle', False, '')
whitelist.addElement('Transmission Runs', 'FirstTransmissionRun', 'Transmission runs', False, '')
whitelist.addElement('Q min', 'MomentumTransferMin', 'Q min', False, '')
whitelist.addElement('Q max', 'MomentumTransferMax', 'Q max', False, '')
whitelist.addElement('dQ/Q', 'MomentumTransferStep', 'Resolution', False, '')
whitelist.addElement('Scale', 'ScaleFactor', 'Scale Factor', False, '')
will produce a the same table as the first example.
Note
This is a mandatory argument.
Pre-processing algorithms are algorithms used to pre-process certain columns. In Reflectometry at ISIS, we
need to pre-process columns Run and Transmission when users enter more than one run. As
an example, consider the following table:
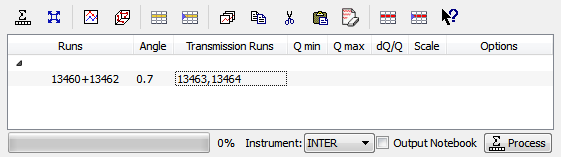
We want the widget to load run INTER00001 (note the instrument combo box below the table), run
INTER00002 and run INTER00003 and sum these runs together. For transmission runs, we
also want to load runs INTER00010 and INTER00011 but in this case the runs should be
combined using a different algorithm, CreateTransmissionWorkspaceAuto v2. This is achieved by using a
pre-process map, an object that uses a map behind the scenes, where keys are column
names and values are pre-processing algorithms. In this example, a pre-process map would be defined as:
preprocess_map = MantidQt.MantidWidgets.DataProcessor.PreprocessMap()
preprocess_map.addElement('Runs', 'Plus')
preprocess_map.addElement('Transmission Runs', 'CreateTransmissionWorkspaceAuto')
This object tells the widget that runs in column Runs have to be combined using the
Plus v1 algorithm, and runs in column Transmission Runs have to be pre-processed
with CreateTransmissionWorkspaceAuto v2. There is no restriction in the number of columns
to pre-process, but there are some limitations in terms of the allowed pre-processing algorithms:
The pre-processing is a follows:
Note that in this context pre-processing refers to algorithms used to combine two or more
runs specified in the same column. It does not refer to additional processing of the loaded runs. For instance, the widget is not
able to Load v1 and Rebin v1 a workspace or apply any other algorithms to the loaded
run. This means that, if only one run is specified no pre-processing is needed, as the widget only has to load the
corresponding run. Runs that need to be pre-processed must be specified as a list separated by +
or ,.
When pre-processing using the above pre-process map, the widget will create different workspaces in the ADS:
13460 that corresponds to the loaded run INTER0001346013462 that corresponds to the loaded run INTER0001346213460_13462 that corresponds to the sum of the two workspaces above13463, corresponding to run INTER0001346313464, corresponding to run INTER0001346413463_13464 corresponding to the combined transmission runThe names of the above workspaces can be controlled to some extent by providing an extra parameter when creating the pre-process map. This extra parameter corresponds to a prefix that will be added to the loaded workspaces. The example below:
preprocess_map = MantidQt.MantidWidgets.DataProcessor.PreprocessMap()
preprocess_map.addElement('Runs', 'Plus', 'TOF_')
preprocess_map.addElement('Transmission Runs', 'CreateTransmissionWorkspaceAuto', 'TRANS_')
Produces the following workspaces:
TOF_13460, corresponding to run INTER00013460TOF_13462, corresponding to run INTER00013462TOF_13460_13462, corresponding to the sum of the two workspaces aboveTRANS_13463, corresponding to run INTER00013463TRANS_13464, corresponding to run INTER00013464TRANS_13463_13464 corresponding to the combined transmission runAdditionally, there is one more extra parameter that can be specified. It is a list of comma-separated strings that refer to the blacklist of algorithm properties that should not be shown in a hinting line edit associated with the algorithm. Note that such hinting line edit is not included by default in the widget, and has to be added manually.
Note that, at the moment, even if users are not supposed to enter more than one run, you’ll have to specify a pre-processing algorithm so that runs can be loaded.
Note
This is an optional argument.
Note that if a pre-processed run already exists in the ADS with the same name, the widget will use it to avoid loading it again.
The processing algorithm refers to the main reduction algorithm that is used to reduce the runs. Processing algorithms must satisfy the following conditions:
A processing algorithm can be created like this:
alg = MantidQt.MantidWidgets.DataProcessor.ProcessingAlgorithm('ReflectometryReductionOneAuto','IvsQ_binned_, IvsQ_, IvsLam_')
This tells the widget that each rown in the table should be reduced with ReflectometryReductionOneAuto v3, and
the output workspaces resulting from the reduction should be named with prefixes IvsQ_binned_, Ivs_Q and
IvsLam_. The number of comma-separated prefixes must match the number of output workspaces
of the algorithm, otherwise an excpetion will be thrown when constructing the widget. Additionally, a
blacklist of algorithms properties can be provided as a string of comma-separated algorithm property names:
alg = MantidQt.MantidWidgets.DataProcessor.ProcessingAlgorithm('ReflectometryReductionOneAuto', 'IvsQ_binned_, IvsQ_, IvsLam_',
                                                               'InputWorkspace,'
                                                               'ThetaIn,'
                                                               'FirstTransmissionWorkspace,'
                                                               'SecondTransmissionWorkspace,'
                                                               'MomentumTransferMin,'
                                                               'MomentumTransferMax,'
                                                               'MomentumTransferStep,'
                                                               'ScaleFactor,'
                                                               'OutputWorkspaceBinned,'
                                                               'OutputWorkspace,'
                                                               'OutputWorkspaceWavelength,')
The only effect of the blacklist is on the Options column, not in the reduction. This column uses a HintingLineEdit (a MantidWidget) delegate to provide auto-completion functionality so that when users start typing in this column, they get a list of algorithm property names they can easily select. The figure below illustrates this behaviour:
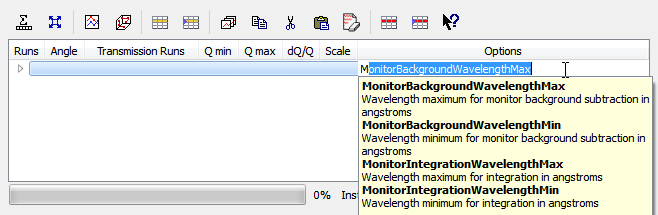
Note that only those algorithm properties that have not been blacklisted are shown: MomentumTransferMin,
MomentumTransferMax and MomentumTransferStep, which are also input properties of our main
reduction algorithm, ReflectometryReductionOneAuto v3, are not displayed when users start typing with character M.
Normally, you’d want to black list the input/output workspace properties and properties that are linked to the table columns. In this example,
as ThetaIn is linked to column Angle (see the whitelist definition in section Whitelist),
MomentumTransferMin is linked to column Q min and so on, it does not make sense for them to appear
as additional options for the reduction.
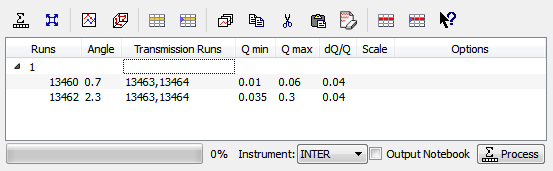
To illustrate how the reduction takes place, consider the white list and pre-processing map defined in the previous sections, and consider the following table:

The widget iterates over each column. If the cell is not empty, it checks if the column needs to be pre-processed (essentially by checking if the column name is contained in the pre-process map), and if so, loads and pre-processes the specified runs. Then it gets the algorithm property name linked to the column and sets the pre-processed run as the workspace for that property. If the column does not need to be pre-processed, it simply assigns the value in the cell to the algorithm property. Below is a summary in pseudocode:
IAlgorithm_sptr alg =
      AlgorithmManager::Instance().create(processing algorithm name);
alg->initialize();

for (int i = 0; i < columns - 1; i++)
      if (cell is not empty)

        get the algorithm_property linked to this column from the white list;

            if (column_name in pre_process_map)
              load and pre-process_runs;
              alg->setPropertyValue(algorithm_property, pre_processed_runs);

            else
              alg->setPropertyValue(algorithm_property, cell);
Column Options is treated separately: the value in this cell is expected to be a comma-separated list of input properties with their values, as illustrated in the figure above. The widget simply parses this string:
auto optionsMap = parseKeyValueString(options);
for (auto kvp = optionsMap.begin(); kvp != optionsMap.end(); ++kvp) {
  try {
    alg->setProperty(kvp->first, kvp->second);
  } catch (Mantid::Kernel::Exception::NotFoundError &) {
    throw std::runtime_error("Invalid property in options column: " +
                             kvp->first);
  }
}
Finally the algorithm is executed and the widget reduces the next row in the same way.
Note
This is a mandatory argument.
A post-processing algorithm defines the way in which a group of runs should be post-processed. As an example, in Reflectometry at ISIS, a run typically consists in two or three runs measured under the same conditions of temperature, magnetic field, etc, but at different incident angles. These runs belong to the same group and need to be stitched together. The post-processing algorithm is in this case Stitch1DMany v1, and can be defined as:
post_alg = MantidQt.MantidWidgets.DataProcessor.PostprocessingAlgorithm('Stitch1DMany', 'IvsQ_')
As with pre-processing and processing algorithms, a third parameter indicating the list of properties to blacklist can be used. As with the pre-process map, you must add manually a hinting line edit and link the post-processing black list to it, as this functionality is not available by default.
post_alg = MantidQt.MantidWidgets.DataProcessor.PostprocessingAlgorithm('Stitch1DMany', 'IvsQ_', 'InputWorkspaces, OutputWorkspaces')
Note
This is an optional argument.
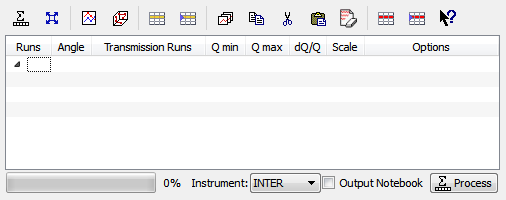
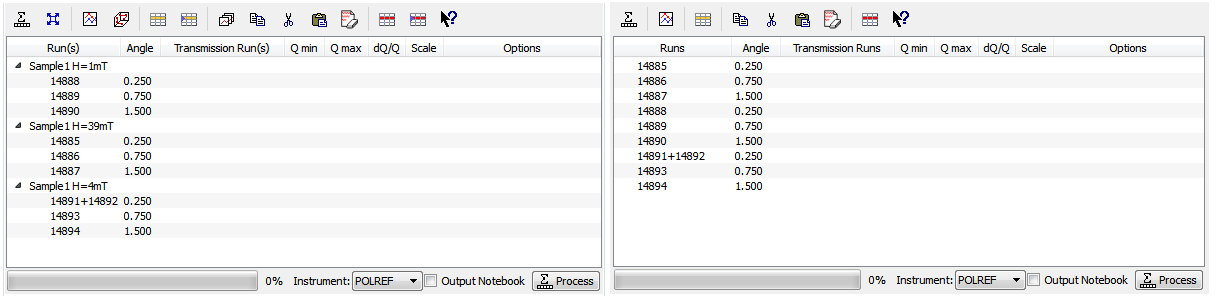
Note that this is an optional argument. When a post-processing algorithm is defined, the table is arranged as a two-level tree where parent items are groups and child items are runs. Different runs (child items) can belong to the same group (parent) as shown on the left figure below. Note that you can enter a name for the group but it will not be used in the reduction. However, when no post-processing is defined, parent items no longer make sense, and the table is arranged as a on-level tree, as illustrated on the right figure below. Note that table editing options referring to groups are also removed. See section Table editing actions for more details.
Note
Note that, because the widget is currently only used in the ISIS Reflectometry interface with a post-processing algorithm, the functionality without it is not well tested in terms of the table-editing options, more specifically in terms of adding/deleting/copying/pasting rows.
In addition to the post-processing algorithm, a post-process map can also be specified (note that this is a C++ feature only which is not currently exposed to Python). A post-process map is a STL map where keys are column names and values are algorithm property names referring to the post-processing algorithm. This can be used when you need to use the values in a column as input properties to the post-processing algorithm.
One you have defined all the elements above, at least the mandatory ones, the widget can be created like this in Python (in C++ the code would be the equivalent of the code below):
data_processor_table = MantidQt.MantidWidgets.QDataProcessorWidget(whitelist, preprocess_map, alg, post_alg, self)
By default, the widget will use Load v1 to load the runs.
In C++ it is possible to specify the loading algorithm the widget should use (for instance,
in Reflectometry at ISIS we use LoadISISNexus v2). However, at the moment
this is only possible if both pre-processing and post-processing algorithms are specified. The only
reason for this is that it was requested by Reflectometry scientists at ISIS, who work with pre-processing
and post-processing. However, if you need to implement this, all you need to do is add an optional
string argument to the relevant GenericDataProcessorPresenter constructor. For instance,
assuming that you don’t need to pre-process and post-process groups of runs, the constructor:
// Constructor: no pre-processing, no post-processing
GenericDataProcessorPresenter(
    const WhiteList &whitelist,
    const ProcessingAlgorithm &processor);
should become:
// Constructor: no pre-processing, no post-processing
GenericDataProcessorPresenter(
    const WhiteList &whitelist,
    const ProcessingAlgorithm &processor,
    const std::string &loader = "Load");
Then in the implementation, the following should be enough:
/**
* Delegating constructor: no pre-processing, no post-processing
* @param whitelist : The set of properties we want to show as columns
* @param processor : The processing algorithm
* @param loader :: The loading algorithm
*/
GenericDataProcessorPresenter::GenericDataProcessorPresenter(
    const WhiteList &whitelist,
    const ProcessingAlgorithm &processor,
    const std::string &loader)
    : GenericDataProcessorPresenter(
          whitelist,
          std::map<std::string, PreprocessingAlgorithm>(),
          processor, PostprocessingAlgorithm(),
          std::map<std::string, std::string>(), loader) {}
In addition, if you are using the widget in a Python interface, you will have to expose this
functionality using SIP. You first need to modify the relevant QDataProcessorWidget
constructor and make it pass the loading algorithm to the GenericDataProcessorPresenter.
Assuming the example above, i.e. no pre-processing and no post-processing, the constructor:
// Constructor: no pre-processing, no post-processing
QDataProcessorWidget(const WhiteList &,
                     const ProcessingAlgorithm &,
                     QWidget *parent);
should become:
// Constructor: no pre-processing, no post-processing
QDataProcessorWidget(const WhiteList &,
                     const ProcessingAlgorithm &,
                     const QString &loader,
                     QWidget *parent);
and then the implementation would be:
/** Delegating constructor, no pre-processing, no post-processing
* @param whitelist :: The white list
* @param algorithm :: The processing algorithm
* @param loader :: The loading algorithm
* @param parent :: The parent of this view
*/
QDataProcessorWidget::QDataProcessorWidget(
    const WhiteList &whitelist,
    const ProcessingAlgorithm &algorithm,
            const QString &loader, QWidget *parent)
    : QDataProcessorWidget(
          std::make_unique<GenericDataProcessorPresenter>(whitelist,
                                                                     algorithm,
                                                                     loader.toStdString()),
          parent) {}
Finally, you will need to modify file qt/python/mantidqtpython/mantidqtpython_def.sip to include the
above constructor:
class QDataProcessorWidget : QWidget
{
%TypeHeaderCode
#include "MantidQtWidgets/DataProcessorUI/QDataProcessorWidget.h"
%End
public:
QDataProcessorWidget(const MantidQt::MantidWidgets::DataProcessor::WhiteList &,
                     const MantidQt::MantidWidgets::DataProcessor::ProcessingAlgorithm &,
                     const QString &,
                     QWidget *parent );
...
}
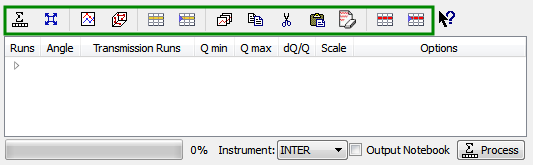
The widget comes with a set of table-editing options. Some of them are shown in the toolbar above the processing table:
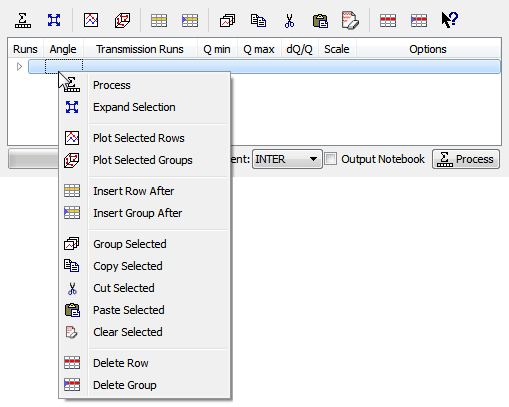
These are also shown in a context menu when clicking on a row in the table:
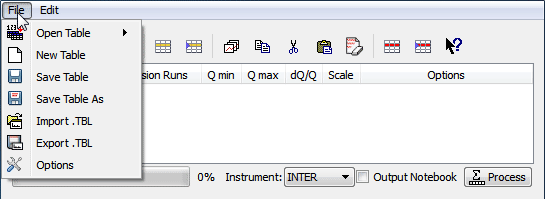
Other actions are not shown by default but the widget can export them so that they can be added to the parent widget containing the data processor widget. In the example below, all the available editing options have been added to two menus: a File menu, which contains actions to save/load/open a new table, as well as general options related to error/warning messages and rounding, and an Edit menu containing the options shown on the toolbar:
Note that when no post-processing algorithm are defined, some of the options that refer to groups do not make sense, and therefore, they are not shown and cannot be accessed. Below is a description of the available actions.
| Action | Description |
|---|---|
| Open Table | A submenu containing a list of valid TableWorkspaces that can be loaded in the processing table for processing. Valid table workspaces are those who have the same number of columns as the processing table. |
| New Table | Discards the current contents of the processing table presenting a blank table. |
| Save Table | Saves the current contents of the processing to the TableWorkspaces it came from. If no such workspace already exists, a new one can be created. |
| Save Table As | Saves the current contents of the processing table to a new table workspace. |
| Import .TBL | Opens a LoadTBL dialog, enabling you to load a .tbl file into the processing table. A table
workspace is also created in the ADS. |
| Export .TBL | Opens a SaveTBL dialog, enabling you to save a table workspace to a .tbl file. |
| Options | Opens the Options menu. This menu allows to adjust settings related to warning/error messages and rounding options. |
| Process | Processes the selected runs, or, if no runs are selected, all of the runs in the table. When post-processing is defined and a group is selected, runs belonging to the same group are post-processed together. |
| Expand Selection | This action is only available when post-processing is defined. It expands your selection such that the group containing the row you have selected is selected. |
| Plot Selected Rows | Creates a plot of the reduced workspaces generated by any of the selected rows. |
| Plot Selected Groups | Only available when post-processing is defined. Creates a plot of the post-processed workspaces generated by any of the selected groups. |
| Insert Row | Adds a new row after the first selected row, or at the end of the group if a group was selected. If nothing was selected the new row is appended at the end of the last group. |
| Insert Group | Only available when post-processing is defined. Adds a new group after the first selected group, or at the end of the table if no groups were selected. |
| Group Rows | Only available when post-processing is defined. Takes all the selected rows and places them in a group together, separate from any other group. |
| Copy Rows | Copies the selected rows to the clipboard. In the clipboard, each column’s value is separated by a tab, and each row is placed on a new line. |
| Cut Rows | Copies the selected rows, and then deletes them. |
| Paste Rows | Pastes the contents of the clipboard into the selected rows. If no rows are selected, new rows are inserted. |
| Clear Rows | Resets the cells in any selected rows to their initial value, in other words, blank. |
| Delete Row | Deletes any selected rows. If no rows are selected, nothing happens. For groups, if the single row of a group is selected for deletion, the group will also be deleted. |
| Delete Group | Only available when post-processing is defined. Deletes any selected Groups. If no groups are selected, nothing happens. |
| What’s This | Provides guidance on what various parts of the interface are for. |
The widget emits a runPythonrunPythonCode(const QString &) signal to plot workspace and load/save
a .tbl file. The parent widget containing the data processor widget must catch this signal and re-emit it
so that the python code is executed.
The widget will use the data in the table to generate a name for the output workspace. The way in which the output name is generated also depends on the way the whitelist has been defined and on the prefixes specified in the processing algorithm (and post-processing algorithm if defined).
First, the name of the reduced workspaces will start with the prefix specified when constructing the processing algorithm, that is, if the processing algorithm was created as:
alg = MantidQt.MantidWidgets.ProcessingAlgorithm('ReflectometryReductionOneAuto','IvsQ_binned_, IvsQ_, IvsLam_','')
the name of the first output workspace returned by the processing algorithm will start with prefix
IvsQ_binned_, the name of the second output workspace return by the algorithm will start with
IvsQ_, and the third output workspace name will start with IvsLam_.
Next, the whitelist is considered: only those columns with fourth argument set to true will be considered.
In addition, if a prefix was also specified, it will be added to the name too. For instance, if we have a white list:
# White list
whitelist.addElement('Runs', 'InputWorkspace', 'The run to reduce', True, '')
whitelist.addElement('Angle', 'ThetaIn', 'The incident angle', False, '')
whitelist.addElement('Transmission Runs', 'FirstTransmissionRun', 'Transmission runs', False, '')
whitelist.addElement('Q min', 'MomentumTransferMin', 'Q min', True, 'q_')
whitelist.addElement('Q max', 'MomentumTransferMax', 'Q max', False, '')
whitelist.addElement('dQ/Q', 'MomentumTransferStep', 'Resolution', False, '')
whitelist.addElement('Scale', 'ScaleFactor', 'Scale Factor', False, '')
and a table:
The names of the reduced workspaces will be IvsQ_binned_13460_q_0.01_0.3,
IvsQ_13460_q_0.01_0.3 and IvsLam_13460_q_0.01_0.3 respectively for the first row, as columns
Runs, Q min and Q max have been marked to generate the workspace names,
and in addition a prefix has been added to column Q min. Analogously, for the second row,
the reduced workspaces will be named IvsQ_binned_13462_q_0.01_0.3,
IvsQ_13462_q_0.01_0.3 and IvsLam_13462_q_0.01_0.3 respectively.
If a post-processing algorithm is defined:
post_alg = MantidQt.MantidWidgets.DataProcessor.PostprocessingAlgorithm('Stitch1DMany', 'stitched_', 'InputWorkspaces, OutputWorkspaces')
the name of the post-processed workspace will start with prefix specified in the post-processing algorithm, stitched in this case,
plus the names of the reduced workspaces without their prefixes joined with “_”. That is, in this example we would get a workspace
called stitched_13460_q_0.01_0.06_13462_q_0.035_0.3.
Columns left empty will be auto-populated after the reduction with the default values of the corresponding algorithm properties.
Once the widget has been created, you can specify the list of instruments that should appear in the instrument combo box:
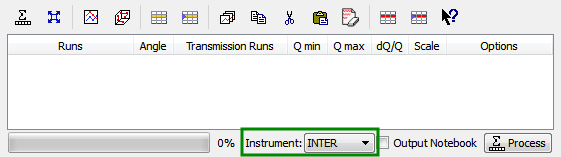
like this:
data_processor_table.setInstrumentList('INTER, POLREF, OFFSPEC', 'INTER')
where the first argument is a comma-separated list of instruments, and the second argument is the instrument that will be
set by default when opening the interface. In C++, this can be done in a similar way using the method
GenericDataProcessorPresenter::setInstrumentList(const std::vector<std::string> &instruments, const std::string &defaultInstrument),
where the list of instruments is specified as a vector of strings.
Runs can be transferred to the table using the method transfer(). In C++ this method takes a vector of maps as the argument, where
each vector represents a row, and maps contain for each row (key) the value that should be inserted into the table (value). For instance, the following:
std::vector<std::map<std::string, std::string>> runs = {
  {{"Group", "0"}, {"Runs", "13460"}, {"Angle", "0.5"}, {"Scale", "1"}},
  {{"Group", "0"},{{"Runs", "13462"}, {"Angle", "1.5"}, {"Scale", "2"}}}};
will add two new rows populated with values:
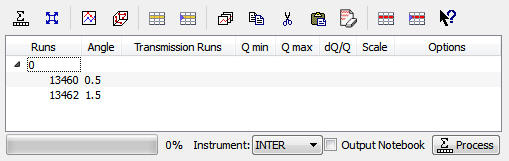
Note that a key “Group” must be specify with a value corresponding to the name of the group where the runs will be added. If no post-processing algorithm is specified, it can be omitted. The equivalent in Python is a Qlist<QString> as shown below:
self.data_processor_table.transfer(['Group:0,Runs:13460,Angle:0.5,Scale:1', 'Group:0,Runs:13462,Angle:1.5,Scale:2'])
Global options are options common to all the rows in the processing table. At the moment, they have to be specified outside the widget. In Reflectometry for instance, this is done via a separate tab called Settings where users can enter values that will be used to reduce all the rows in the processing table. This behaviour is achieved by making the parent containing the widget inherit from DataProcessorMainPresenter. This is an abstract base class defining methods to retrieve global options for pre-processing, processing, and post-processing. More specifically, the methods you will have to implement are listed below:
key=value pairs.
Example: Runs, AllowDifferentNumberSpectra=1; Transmission Runs, WavelengthMin=2.0, WavelengthMax=4.0 will make the
widget apply AllowDifferentNumberSpectra=1 to Plus v1 and WavelengthMin=2.0, WavelengthMax=4.0 to
CreateTransmissionWorkspaceAuto v2, assuming the pre-process map defined in section Pre-processing Algorithms and Pre-process Map.key=value pairs. Example:
WavelengthMin=3.5, Params="1,2,3".ScaleRHSWorkspace=1, ManualScaleFactor=0.5.In addition, because the widget is a WorkspaceObserver observing changes in the ADS, you may want to implement method notifyADSChanged(). The purpose of this method is to update the OpenTable action (see section Table editing actions for more details about this command) with the list of table workspace that can be loaded into the interface.
An example of a C++ interface currently using the widget is the Reflectometry GUI at ISIS. The relevant classes creating and communicating with the widget are listed below:
QtReflRunsTabViewReflRunsTabPresenterBoth can be found in MantidQt/CustomInterfaces, the first one is the view in the MVP pattern, responsible for creating the widget, and the second one is the presenter in the MVP pattern, responsible for interacting with the widget in terms of providing global options for the reduction.
There is a toy example written in Python that can be found in mantid/scripts/Interface/ui/dataprocessorinterface.
It is currently invisible to users, but you can make it visible for you by adding Utility/DataProcessorInterface.py to
Framework/Properties/Mantid.properties.template. This will make the toy example appear under category Utility.